The Steam Deck gets plenty of love as an indie machine. Fair enough. It runs Hades beautifully, turns Balatro into a dangerous bedtime mistake, and handles a ridiculous amount of console emulation with very little drama.
I even wrote my Gothic 1 Remake review based entirely on my experience playing it on the Steam Deck. But that is not the part that still makes me grin.
The Steam Deck’s real party trick is that it can become a portable Windows 95, Windows 98, and Windows XP game box without actually running Windows. That sounds backwards until you spend a weekend trying to make Deus Ex behave on a modern Windows 11 desktop. Then the joke lands. Old PC games were built for weird driver assumptions, old DirectX versions, tiny registry hacks, half-forgotten video codecs, and installers that think 1,024 MB of RAM means you are running a NASA workstation.
Modern Windows does not always love that. Linux, through Proton, often does.
That is the funny bit. Valve built the Steam Deck around Linux, and the compatibility work behind Steam Play has quietly become one of the best ways to run older Windows PC games. Not every game works on the first click. Let’s not pretend Thief, Fallout 2, or Heroes of Might and Magic III were designed with a handheld OLED screen and suspend mode in mind. But with the right tools, the Deck turns into a tiny retro PC that you can play on the sofa.
This guide walks through the setup I would use on a fresh Deck: GOG through Heroic, GE-Proton for stubborn Windows games, Boxtron, Roberta, and Luxtorpeda for the older and weirder stuff, then proper controls so you do not end up playing Baldur’s Gate like you are defusing a bomb.
A Quick Scope Note: This guide is about classic PC games. Console emulation (NES, SNES, PS1, and friends) is a different rabbit hole, and EmuDeck handles that side far better than I could cram in here. We are staying strictly on the PC side.
Before You Start: The Thing That Breaks More Games Than Linux Ever Will
Here is the part most Steam Deck guides skip.
The biggest reason an old game refuses to run is usually not Proton, not Linux, and not the Deck. It is DRM. Late-90s and 2000s disc protection like SecuROM and SafeDisc was hostile even on the hardware it shipped for, and it is almost guaranteed to choke on a modern system, Windows included. If that’s your situation, I broke the whole process down in how to run old PC game discs on Windows 11. The Deck has no drive, but you can image the disc and copy it across.
This is the single best argument for buying classic games on GOG. GOG strips that DRM out and ships clean, patched installers. We went deep into how these storefronts handle old-school software in our full Steam vs GOG breakdown for classic PC games, but the short version is simple: if there is a DRM-free digital version of a classic title available, your life gets shorter and happier by using it.
Phase 1: Use GOG and Heroic Games Launcher
If you care about classic PC games, GOG should be your first stop.
Steam has plenty of old games, and some of them work well. But GOG built its reputation on selling DRM-free PC classics that already include a lot of the boring fixes. You usually get cleaned-up installers, bundled DOSBox configs, patched executables, or compatibility tweaks that save you from hunting through twenty-year-old forum posts at 1:13 a.m.
That matters on the Steam Deck because you want fewer launchers, fewer activation checks, and fewer chances for an ancient installer to throw a fit.
The catch? GOG Galaxy does not have a native Linux version.
That sounds like a wall. It is more of a speed bump. The usual solution is the Heroic Games Launcher, a Linux-friendly frontend that supports GOG, Epic Games Store, and Amazon Games. For this guide, we care about the GOG part.
How to Install Heroic on the Steam Deck
To set this up, you need to leave Gaming Mode for just a few minutes:
- Hold the Power button on your Deck.
- Choose “Switch to Desktop”.
- Open the Discover store from your taskbar (the blue shopping bag icon).
- Search for “Heroic Games Launcher”.
- Click Install.
- Launch Heroic from your application menu and sign in to your GOG account.
Desktop Mode looks a bit like the Steam Deck borrowed a tiny Linux laptop costume. That is normal. You can use the right trackpad as a mouse, the right trigger as left click, and the left trigger as right click. It feels odd for five minutes, then your hands get it.
Once Heroic sees your GOG library, install something friendly first. Do not start with the most cursed CD-ROM relic you own. Try Fallout 2, Heroes of Might and Magic III, Deus Ex, or System Shock 2. These are old enough to prove the setup works, but popular enough that many community fixes already exist inside the install files.
The Heroic Settings Worth Changing
Heroic can launch games from Desktop Mode, but the real goal is to make them feel like normal Steam Deck games. Open Heroic’s settings panel and look for this specific option:
- Add games to Steam automatically (Turn this ON)
This is one of those small toggles that makes the entire setup feel less hacky. When enabled, Heroic automatically adds your installed GOG games as non-Steam shortcuts. After that, you can return to Gaming Mode and launch Fallout 2 or Deus Ex straight from your regular Steam library.
This also gives you immediate access to Steam Input, custom controller layouts, per-game performance settings, and system-level suspend mode. In other words, the Deck starts treating your old GOG game like it completely belongs there.
Why Heroic Beats Manual Installers
You can install GOG games manually through raw Wine. You can also build custom Bottles prefixes, mess with winetricks, and manually add shortcuts to Steam. I have done it. It works. It also turns a perfectly good Saturday into an uncompensated system administration exercise.
Heroic gives you a cleaner path. It handles the backend downloads, keeps each game easier to manage, and lets you pick different Wine or Proton versions per game. That last part matters because classic PC games are moody little gremlins. Deus Ex might like one compatibility layer, while a different game may need another. Heroic keeps that fiddling isolated. Save the manual Wine configuration for the rare games that deserve the pain, like a non-GOG CD copy with a custom no-CD patch applied.
Phase 2: Install GE-Proton for Old Video Cutscenes and Stubborn Games
Valve’s standard Proton is excellent. For many games, you can leave it alone and enjoy your evening. Then an old FMV intro tries to play.
The screen goes pitch black. The audio stutters. The game crashes before you even see the main menu. Maybe the cutscene worked flawlessly on your old Pentium III back in 2001, but now it behaves like you asked the Deck to decode a haunted postage stamp.
A lot of classic PC games used old Windows video formats: think intro movies, publisher logos, mission briefings, and those gloriously compressed CGI cutscenes that looked mind-blowing on a CRT. Standard Proton does not always ship with every old proprietary media component those games expect, which can completely break titles that otherwise run fine.
This is where GE-Proton comes in.
GE-Proton is a community build maintained by GloriousEggroll. It frequently bundles licensing fixes and media handling capabilities that haven’t landed in Valve’s default Proton builds. You do not need it for every single game, but when a game crashes right during the intro videos, GE-Proton is usually the very first tool to grab.
How to Install ProtonUp-Qt
The easiest way to manage custom Proton layers on the Steam Deck is a handy tool called ProtonUp-Qt. You will use this same tool again in Phase 3, so it is worth setting up properly:
- Hold Power and choose “Switch to Desktop”.
- Open the Discover store.
- Search for “ProtonUp-Qt” and install it.
- Launch the app from your application menu.
- Make sure the install target is set to Steam.
- Click “Add version”, choose GE-Proton, select the latest release, and click Install.
After the installation finishes, restart Steam. If you are still in Desktop Mode, fully close Steam and reopen it. If you are heading back to Gaming Mode, restart the Deck or switch modes. Steam needs a quick refresh before it will recognize the new compatibility tool.
How to Force a Game to Use GE-Proton
Once GE-Proton is sitting on your Deck, you can assign it on a per-game basis in Gaming Mode:
- Open the game page in your Steam library.
- Press the gear icon on the right side of the screen.
- Choose Properties.
- Go to the Compatibility tab.
- Check the box for “Force the use of a specific Steam Play compatibility tool”.
- Select your newly installed GE-Proton version from the dropdown menu.
For a Heroic-added GOG shortcut, you can do this exact same step in Steam, or you can choose your Wine/Proton versions directly inside the Heroic settings menu itself.
My rule of thumb is simple: start with the default configuration. If the game runs, do not touch it. If it crashes at startup, hangs at a movie, or shows a black screen before the menu, swap it over to GE-Proton.
When GE-Proton is Not Enough: Protontricks and WMP11
GE-Proton fixes a surprising number of old-game tantrums, but it isn’t a magic fix for every broken movie asset. The classic stubborn case is a game that still refuses to play its intro videos no matter which compatibility layer you swap to.
The reliable fix here is older than the Deck itself: dropping the missing system components straight into that specific game’s virtual directory prefix using Protontricks. For a lot of these titles, the missing piece is Windows Media Player 11, which you can inject using the wmp11 winetrick command. Install Protontricks from the Discover store, point it at your game, select the wmp11 trick, and a massive chunk of “dead cutscene” problems quietly resolve themselves.
A Word About “Latest”
The latest version of GE-Proton is usually where I start, but classic PC gaming does not always reward modern instincts. Newer Proton iterations can actively break older games. If a title fights you, do not only roll back GE-Proton a version or two. Try an older mainline Valve Proton build as well. All the way down to the 5.x or 6.x range for genuinely ancient Windows 9x-era games. Older digital translation engines often understand old code structures better than the newest ones do.
This is completely normal. Retro PC gaming has always had a bit of witchcraft in it; the Steam Deck just gives you a nicer cauldron to stir. If you want to see how these methods compare to dealing with modern desktop environments, you can look at our comprehensive Windows 11 classic PC game troubleshooting guides for a direct comparison.
Phase 3: Boxtron, Roberta, and Luxtorpeda
Not every classic PC game is a Windows game. Some live natively in DOS. Some are classic point-and-click adventures that run significantly better through a modern open-source interpreter than through their original executable.
The good news is that you do not need a separate, complex manual workflow for any of this. The exact same ProtonUp-Qt application you installed in Phase 2 can download three sister tools that slot straight into your Steam compatibility menus exactly like GE-Proton:
- DOS game? Use Boxtron.
- Point-and-click adventure? Use Roberta.
- Game with a great native Linux source port? Use Luxtorpeda.
Boxtron for DOS Games
Boxtron runs DOS games through a native Linux build of DOSBox, presenting it cleanly to Steam as a standard compatibility tool. That covers the entire golden era of DOOM, Commander Keen, Duke Nukem 3D, Master of Orion, and the early Ultima titles.
Install it through ProtonUp-Qt the same way you installed GE-Proton: open the tool, click “Add version”, choose Boxtron, install it, and restart Steam. Then force Boxtron on the game via the Properties menu.
If you bought your DOS games from GOG, they often arrive preconfigured with their own internal DOSBox wrappers, and Heroic can launch many of them without you touching a single line of code. Let that automated system do the heavy lifting first. Reach for Boxtron when a DOS game lives natively on Steam, or when a GOG configuration misbehaves and you want a clean, native Linux DOSBox instance running underneath it.
Roberta for Adventure Games
Roberta does for ScummVM what Boxtron does for DOSBox. It runs point-and-click adventures through a native Linux build of ScummVM, acting as a direct Steam compatibility layer. The name is a direct tip of the hat to Roberta Williams, which tells you exactly which era of Sierra and LucasArts titles it loves.
This is easily the superior path for legendary titles like The Secret of Monkey Island, Day of the Tentacle, Sam & Max Hit the Road, Broken Sword, and Beneath a Steel Sky. You still need the underlying game data files, but you do not need the ancient, temperamental EXE file to behave.
Install Roberta through ProtonUp-Qt, restart Steam, and force it on the game from the Compatibility tab. Done.
Luxtorpeda for Native Engines and Source Ports
Luxtorpeda is an incredibly clever tool. Instead of running an old Windows game through Proton’s translation layers, Luxtorpeda checks to see if an open-source, native Linux engine or source port exists for that title. If it finds one, it automatically downloads it, moves your game files over, and launches the native version.
That frequently translates to perfect modern widescreen support, native controller inputs, better performance, and zero graphical bugs.
To use it:
- Open ProtonUp-Qt.
- Click Add version, select Luxtorpeda, and hit install.
- Restart Steam, navigate to your game’s Properties, and force Luxtorpeda under the Compatibility tab.
It won’t work on every single title, but when it supports a game (like classic Quake, Doom, or Jedi Academy), it feels like swapping out a rusty launch wrapper for a modern engine built specifically for your handheld hardware.
Phase 4: Fix the Controls Before Blaming the Game
Here comes the big handheld reality check. Classic PC games were explicitly designed for a desk, a real physical mouse, a full keyboard, function rows, and a manual thick enough to use as a doorstop. The Steam Deck gives you two thumbsticks, two trackpads, a touchscreen, and a handful of controller buttons.
That sounds like a total mismatch, but it is actually one of the Deck’s biggest hidden strengths. Valve’s Steam Input mapping software is absurdly flexible. You can turn the trackpads into precision mice, build touch-sensitive radial menus, and map your rear buttons to keys like quick-save or inventory toggles. You can build a configuration that makes Thief feel completely playable on a handheld, which still feels slightly illegal.
Start with Community Layouts
Do not build your controller layouts entirely from scratch unless you actively enjoy pain. For almost any popular classic in Gaming Mode:
- Open the game page and click the Controller Icon on the right.
- Click on your current layout template to open the selection menu.
- Tab over to the “Community Layouts” section.
- Browse the configurations created by other retro enthusiasts.
- Pick one with high upvotes or a detailed description, and apply it.
For popular classics, someone has usually done the grueling setup work for you. Good Deus Ex community layouts will map the right trackpad to a high-precision mouse, the left stick to movement, and the rear paddle buttons to contextual actions like leaning or interacting. Fallout 2 layouts focus heavily on combining trackpad mouse controls with fast keyboard hotkeys for your character and inventory screens.
Treat community layouts as a working foundation. If you don’t like a specific bind, you can tweak it in two seconds.
Use the Right Trackpad as Your Mouse
For almost every classic PC game, set the right trackpad to act as a Mouse.
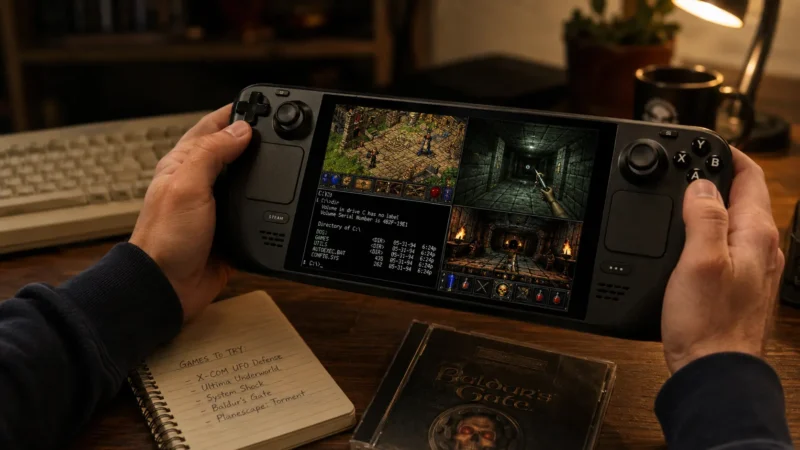
Using an analog thumbstick for a classic strategy or RPG cursor feels like dragging an anchor through thick syrup. The trackpad gives you precise pixel corrections, rapid flicks, and comfortable navigation for menu-heavy interfaces. For games like Fallout 2, Baldur’s Gate, Planescape: Torment, or Heroes III, the trackpad is mandatory.
A great default starting layout looks like this:
- Right Trackpad: Mouse
- Right Trigger: Left Mouse Click
- Left Trigger: Right Mouse Click
- Left Stick: Arrow Keys or WASD (depending on how the camera moves)
Build a Radial Menu for Keyboard Hotkeys
The left trackpad is the perfect home for a custom Radial Menu. A radial menu allows you to touch or click a visual slice of the trackpad to instantly fire off a specific keyboard command. This is a game-changer for classic RPGs and immersive sims that feature dozens of keybinds.
For an immersive sim like Deus Ex, you can map a single trackpad to handle:
F5(Quick-Save) /F9(Quick-Load)I(Inventory) /M(Map)Tab(Goals)- Numbers
1through5for your hotbar slots
To build one yourself:
- Go to the game’s controller layout editor and select Left Trackpad.
- Change its behavior setting from Directional Pad to Radial Menu.
- Add commands to each slice of the virtual wheel and give them clear, human labels (e.g., “Quick Save”).
- Adjust the activation style so it triggers on a click or a soft touch, depending on your preference.
Pro-Tip: Name and save your custom layouts when you are finished. Trust me, three weeks from now, a default file name like “Keyboard Mouse Template Final 2” will mean absolutely nothing to you.
Map the Rear Buttons for Critical Keys
The four rear paddle buttons (L4, R4, L5, R5) are brilliant for commands you need instant access to but never want to press by mistake.
I highly recommend mapping them like this:
- L4: Quick-Save
- R4: Quick-Load
- L5: Inventory or Map screen
- R5: Pause / Tactical Combat Pause
A quick warning on quick-load: assign it somewhere deliberate. Accidentally loading an old save file in a punishing stealth game like Thief is the exact kind of mistake that makes you put the device down and stare blankly at the ceiling for a while.
A Few Practical Fixes for Stubborn Classics
Even with the right translation tools and controller layouts, old-school PC software will occasionally push back. Keep these fundamental troubleshooting rules in your back pocket:
- Set a Lower In-Game Resolution: Many classics behave significantly better at lower native ratios like 800×600 or 1024×768. The Steam Deck’s 1280×800 display handles 4:3 content beautifully with clean vertical black bars. If a game has incredibly tiny text, don’t force a massive resolution hack just because your hardware can handle it. Fallout 2 at a sensible, lower resolution is actually readable; running it at modern high-res settings turns the UI elements into ant-sized dots.
- Check ProtonDB First: Before you spend an hour attempting to rewrite an old config file, head over to ProtonDB. Search for your specific title and read the user reports filed under the “Steam Deck” tab. The community regularly posts the exact Proton version strings, launch options, or specific fan patches required to get temperamental games (like Vampire: The Masquerade – Bloodlines) running cleanly.
- Change One Thing at a Time: When you are testing a genuinely difficult game, avoid the temptation to change ten different configuration parameters simultaneously. Try standard Proton. Then try GE-Proton. Then try an older mainline release. Then try a launch argument. If you apply five fixes at the exact same time, you will never actually know which one solved the issue.
The Deck is Worth the Tinkering
The Steam Deck will not make every classic PC game entirely effortless. Some titles will still require custom fan patches, a bit of trackpad fine-tuning, or a brief visit to Protontricks. A select few will actively fight you tooth and nail simply because crashing on launch appears to be a core part of their historical preservation plan.
But once that initial layer of setup is complete, the handheld turns into an absolute time machine.
You can play the original Deus Ex on a morning train. You can run Heroes of Might and Magic III from the comfort of your couch. You can glide your way through Monkey Island using a high-precision trackpad, and you can suspend Fallout 2 right in the middle of a complex turn-based combat encounter, put the device down to grab a coffee, and resume instantly without praying to the old Windows registry gods.
That is the ultimate appeal of this hardware. Set up your Heroic library, install ProtonUp-Qt, download your compatibility engines, and spend ten minutes dialing in your trackpad layouts. Once that’s done, you can carry decades of PC gaming history anywhere you go.
Your next step is simple: pick one classic title you have been meaning to replay for years, load it into Heroic, and build out a proper control scheme for it. Start with something forgiving. Save Thief for the night when you feel truly brave.